
Do you have a really big cardboard box that you want to reuse? I have the perfect craft for you today – you can make a DIY Cardboard Playhouse or Ice Cream Shop with this tutorial!

We bought a double jogging stroller and a bike trailer at about the same time, so I had 2 big cardboard boxes that I hated to just throw away! I often reuse cardboard boxes, like when I made my own DIY fabric bolts with cardboard for my sewing room, but these were just so big. I just had to come up with something bigger.
I had seen some cardboard playhouses and other play structures on Amazon and thought about buying them for Sophia. They are a more affordable option than plastic playhouses. But why buy when you can build?!

Here’s a tutorial to make your own DIY cardboard playhouse ice cream shop! I made this up as I went. You can really customize anyway you want – or any way your kid wants. Sophia was the one that requested the Ice Cream Shop idea!

The first step in building your own DIY Cardboard Playhouse is to find a big box – or even two! This box was taller than Sophia, which was perfect.

1. I opened the box and taped the flaps up, to make the shop taller. I reinforced the flaps with smaller pieces of cardboard, taped in the creases. Otherwise, the flaps were a little flimsy and wanted to fall in.

2. I chose to cut out the back of the box, leaving a bit of the sides intact to keep it sturdy. I also reinforced the floor with tape.

3. I think the funnest part of this DIY cardboard playhouse ice cream shop is the cute, striped awning! I used the top flap and cut it out just below the fold on the box. You could do this a variety of ways, but this seemed the easiest to me.

4. I made the scallop edges with a half circle by tracing a baby wipes container. Make sure you have a super sharp pair of scissors to cut the scallops out of cardboard – it was a bit tricky.

5. I used Painters Tape to line out my stripes. You could measure, but I just winged it.

6. These nifty little boxes held hardware in one of the stroller boxes, so I opened them up a bit and reinforced them with some tape.
I thought they would make great little holders for some fun things in the end project. I spray painted them when I painted the awning.

7. Once the pink paint on the awning was dry, I took the tape off. I let the pink paint fully dry, then taped over it to paint the white. Obviously, you could paint it all one color, then stripe the 2nd color – I just didn’t think ahead!

8. Sophia wanted a blue Ice Cream Shop – everything in her life is currently blue! It took me a whole can of spray paint and the box really could have used another coat, but I didn’t want to put that much money into it.
My camera showed these spots in the sunlight, but when it’s inside, you can’t see them.

9. Once the blue was dry, I added a small pink rectangle for a fun playhouse sign. I bought decorative duct tape to spruce up the shop a bit. I loved the colors – and the tape also helped to reinforce the box on the creases.
10. Every Ice Cream Shop needs a good counter top! I made this one by putting two rectangles of cardboard together with double-sided tape, which made it more sturdy and thicker. I spray painted it white, then added the decorative duct tape around the edges.

To affix it to the box, I put another couple of rectangles together with double sided tape the exact width apart as the width of the shop window. It stayed pretty well on its own, but I did reinforce it with some hot glue.
11. After putting on the counter top, I attached the small boxes to the inside of the shop with double sided tape.

They are labeled “Spoons”, “Cups”, and “Sprinkles” and sitting on the counter top is the all important one… “Tips”! These were just a little extras and you could totally have fun with these.
12. Lastly, I made some cute ice cream decorations out of craft foam. I simply freehanded these and hot glued them to the cardboard.
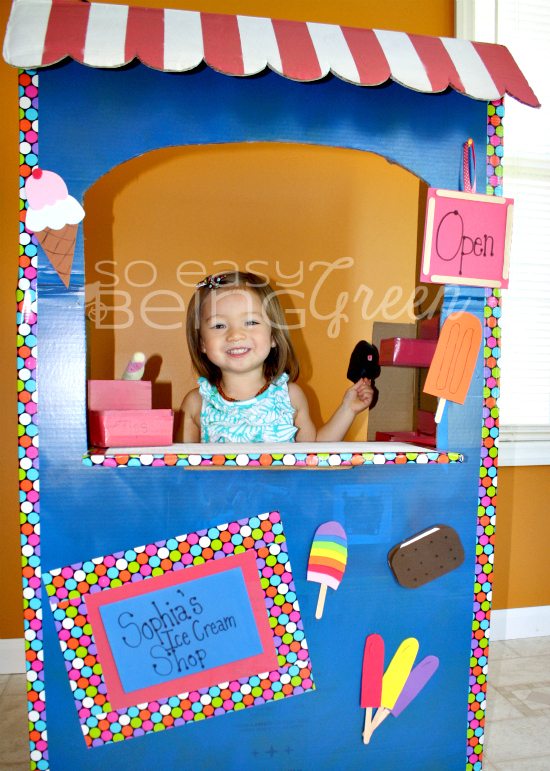
Sophia helped me make the “Open” sign with popsicle sticks and craft foam. The other side says “Closed” so she could flip it depending on when she wanted to play.

This was a fun project that I worked on for a few hours at a time over a couple of weeks. It could probably get done in a couple of days, if you had more time to devote to it!
I just loved re-purposing a big cardboard box that would have normally just been thrown away by others! Sophia is LOVING it too… she sells ice cream to anyone who visits!
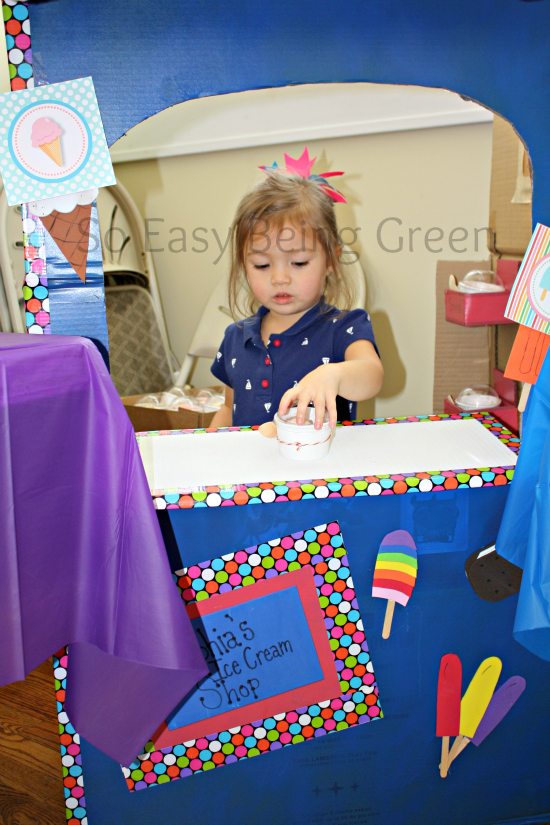
We even used it during Moreaya’s Beach Birthday Party as a way to pass out ice cream!
DIY Cardboard Playhouse - Ice Cream Shop

This DIY Cardboard Playhouse Ice Cream Shop is made with a couple of large cardboard boxes, paint, and duct tape!
Materials
- Large Cardboard Box
- Spray Paint
- Duct Tape
- Craft Foam [optional]
Tools
- Knife or Box Cutter
- Hot Glue
Instructions
- Open your box and tape the flaps up, to make the shop taller. I reinforced the flaps with smaller pieces of cardboard, taped in the creases.
- Cut out the back of the box, leaving a bit of the sides intact to keep it sturdy. Leave the bottom of the box intact to keep it sturdy. Reinforce the floor with tape.
- To make an awning, use the top flap of the side you cut off and cut it just below the fold on the box.
- Make the scallop edges on the awning by tracing a half circle, then cut off excess. Make sure you have a super sharp pair of scissors to cut the scallops out of cardboard – it was a bit tricky.
- Use painter's tape to stripe your awning.
- Spray paint your first color of your awning. I also spray painted a few small cardboard boxes that were inside one of the boxes to use as "trays" in the playhouse.
- Once the awning paint is fully dry, take off tape. Then, tape over what you painted and paint the second color. Make sure 1st color is fully dry.
- Spray paint the entire front of your box. This took 1 whole can for just 1 coat of paint.
- Once that is dry, add in some decorations. I added decorative duct tape to the corners - it helped make the box sturdier, and also provided decoration.
- Next, I made the countertop by gluing 2 pieces of cardboard together. Then, I put 2 small rectangle pieces of cardboard on the under side, leaving space to sit it right on top of the opening of the playhouse. I also secured with hot glue.
- Attach the small boxes with hot glue or double sided tape.
- Decorate your cardboard playhouse with fun decor. I made ice cream out of craft foam then glued to the outside.
- The awning just sits atop the playhouse - you can reinforce with glue or tape if it won't stay.
Notes
See pictures with steps labeled above this tutorial.
This post was originally published in May 2012.
Amber Ludwig
Monday 12th of December 2016
Omgosh this is SO ADORABLE!!! Mad box and tape skills!! Im impressed!!!
the real meaning of So Easy Being Green.
Thursday 30th of May 2013
[...] Turning an old cardboard box into an Ice Cream Shoppe [...]
Laura
Thursday 24th of January 2013
That's insanely cute! If I let my Girl see this she'll want us to buy something to get a box to make one too!
It's a Beach Birthday Party
Thursday 10th of January 2013
[...] We couldn't leave Big Sister out, so she handed out the cute Ice Cream Cups w/ Wooden Spoons our of her Ice Cream Shop! [...]
Forgetful Mom
Tuesday 8th of May 2012
This looks like lots of fun!